Published by Machinery - Volume 10 - Lester Gray French - 1904
THE MAKING OF SOUVENIR SPOONS
How many people as they stop and gaze in a jeweler's display windows and see trays of souvenir spoons with the name of the city or town, or the outline of some prominent building stamped in the bowl or the handle, ever stop to think of the number of operations and the amount of labor required to complete one of these spoons for market?
The majority of these spoons are made of sterling silver, which is purchased from an assayer in an ingot at a certain price per pennyweight. The silver is melted in crucibles and the furnaces are usually gas burning, as the heat has to be great. As the silver melts, a small handful of charcoal is sprinkled over the silver in the crucible; this clears all sediment and draws it all to the surface. When the silver is melted, it is poured into a mold which varies in size, the most common being 3 inches wide, 3/4 inch thick and 12 inches long. This mold is polished and free from all blowholes and small pits that usually appear in cast iron, of which this mold is made. The mold is always made on a slight taper with a false piece of steel fitted at the bottom; this is used in loosening the ingot by driving on the wedge or false piece. The mold is usually heated and swabbed with a piece of oily waste to prevent the metal from adhering. After the silver has cooled in the mold to a certain degree, it is removed and, if found to be free from pits and air-holes, it is scrubbed with hot water, soap and a stiff brush to remove all substance adhering to the ingot.
The next operation consists of breaking down, which is taking the ingot of silver after it has been scrubbed and rolling it through rolls made of tool-steel, hardened, ground and polished. These are usually 6 inches diameter with a 10-inch face, the size being generally determined by the size of the ingot to be rolled. The silver passing and repassing through these rolls becomes thinner and greater in width at each consecutive rolling, and the rollings are continued until the sliver begins to crack on the edges. The operator then knows that the metal has become so brittle that it must be annealed before any more rolling can be done. The ingot of silver is now about 3/8 inch thick, 5 inches wide and 20 inches long. The operation of annealing consists of grasping one end of the silver with tongs and passing it back and forth through a gas furnace until it is red-hot; it is then allowed to cool. After cooling, it is placed in an acid bath, which removes all the oxide and discoloring caused by heating. After the acid bath it is plunged in another bath of boiling water and scrubbed to remove all traces of the acid to protect the rolls from being disfigured by same. The silver is dried by covering with hot sawdust and is then put through the same operation of rolling again, the annealing process taking place as often as the silver requires it, which is determined by the silver cracking on the edges as mentioned before.
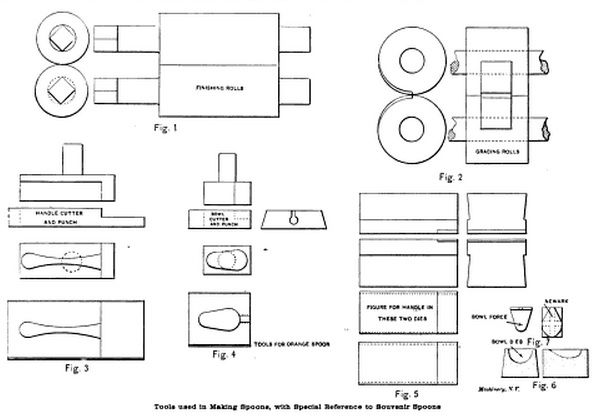
Great care must be taken during the operation of rolling to have the rolls exactly parallel with each other; if the rolls are not parallel the stock will curl and not roll straight, thereby stretching the silver more at one side than at the opposite, which causes it to break. Fig. 1 shows the shape of the rolls used. These rolls have to be ground and polished from time to time as they wear irregular and, therefore, do not roll the silver perfect. Again at times an imperfection appears on the surface of the rolls which must be removed as it will always show on the silver.
After the silver has been rolled to its desired thickness, it is then annealed for the last time, pickled and dried, then taken to the finishing rolls, which are made the same as the breaking down rolls, but smaller in diameter and ground more accurately and polished to a better finish. These rolls do no heavy rolling, but are used simply as sizers to bring the silver uniform in thickness. After passing through the finishing rolls, the silver, which is now in a rolled sheet varying in thickness from 0.025 to 0.035 inch, is taken to a pair of rotary slitting shears where the rough edges are trimmed and the roll of silver stripped into desired widths. The rolls of silver, together with the scrap that comes from the shears and that which remains in the crucible after melting (called the "button") are taken to the office and weighed to determine the shrinkage and waste. The silver is now ready to make into spoons.
The silver being in rolls it is taken to the shears and cut into pieces the desired length which vary according to the size of the spoon. The next operation consists of what is termed "grading," which is tapering the ends of the pieces of the silver for the handle and bowl. The pieces of silver are always cut shorter than the spoon itself as the "grading" operation lengthens the piece. The operation of grading is accomplished by the rolls shown in Fig. 2. These rolls are cut away in the center about 1/2 inch deep at one side and gradually lessening until the cut rises to the face of the roll. This section of the roll is usually about 2 or 3 inches wide, the length being about one-quarter the circumference of the roll. The rolls always run in the direction of the taper, or, in other words, the rolls revolve, so that at one given point the deepest portions of the recesses meet, having at this point a combined depth in the two rolls of 1/4 inch. It is at this point that the spoon is inserted for grading. As the handle and bowl are differently graded, there are two of these recesses in each roll. The pieces of silver are taken between pliers, the jaws of these being of a length to determine the length to which the silver is to be placed in the rolls. When the rolls have come to the point where the recess space is greatest, the operator is ready with the blank adjusted in the pliers. He pushes the projecting portion of the blank in the opening until the pliers come in contact with the rolls. In this position he holds the blank until the rolls grasp it and reduce the taper. The rolls are mounted in housings and are adjustable to any thickness.
Having graded both ends of the blank, it is then blanked out in a die made as shown in Fig. 3, which cuts the form or outline of the handle, leaving the bowl end in the state it left the grading rolls. I will explain the object of performing this operation in this manner. Generally a shop manufacturing spoons of this nature has various designs of handles, also it has a line of bowl dies of various sizes and designs. A mixed order is received in which so many spoons of the order are to have a certain handle and bowl, and a certain number to have another design of handle and bowl. By making the dies as shown, any style of handle can be made on any bowl or fancy spoon. Having blanked the handle, another die, Fig. 4, is used to blank the bowl. The blanks are now ready to have the design stamped on the handles.
This work is done in a drop-hammer between the dies shown in Fig. 5. In the dies is cut the design that is required on the top and bottom of the handle. These dies are called matched dies. The depth of the design always determines the thickness of the silver to be used—the greater depth, the thicker the stock. The blanks then pass through the operation of trimming which consists of being forced through dies similar to Figs. 3 and 4. but instead of the punch being flat, the center is cut away leaving a knife-edge on the outside. This is done to relieve the punch, so it will not disfigure the design, and at the same time allow it to cut a clean edge. Having trimmed the handle and bowl, the next operation consists of bowling, or, in other words, to bend the bowl from the flat to the desired shape.
This work is also done in a drop-hammer with the dies. Fig. 6, and the force, Fig. 7. The die is placed between the poppet on the drop-hammer bed and the force is secured in the jack-die, which is fastened to the hammer. The operator now places a blank on the face of the die. releases the hammer, which descends and the force presses the spoon bowl into the die. An automatic drop-hammer is the best for this operation, as it strikes every blow with the same force. If the name of any city or town or the outline of any particular object is desired in the bowl of the spoon, it is cut in the force as shown in Fig. 7. Doing this brings two operations into one. for, as the bowl is formed, the design appears.
The spoons are now passed on to the bench, where the filing is done. This operation consists of filing off the burrs and ragged edges on the bowl. The spoons then go back to the press department, where the handles are curved by being pressed between two hardwood blocks formed to the shape desired on the handle. The spoons then pass into the polishing room to be "boled"; this work is done on an ordinary polishing head, using a cloth wheel with a coating of rotten-stone, which has to be renewed at intervals. The holing removes all sharp edges and scratches on the silver, after which the spoons are polished by using another cloth wheel coated with crocus.
The spoons are then sent to the coloring room for the next operation, which consists of plating the bowls with gold in an electro-plating bath. Some bowls are oxidized; others pass through the operation of sand-blasting, which gives the spoon a dull finish. The spoons that are gold-plated are sent back to the polishing room and again polished, after which they are washed in a solution of hot water and ammonia to remove all stains, and finally they are dried in hot sawdust, when they are ready for the shipping room.
The souvenir spoon industry is very large, one firm alone having over 1,000 designs for bowls, which include the names of every city in United States and Canada of any size, and a large number of cities in other countries.
Return to Spoon Planet exhibits index